- Cart 0
- English
How does the fluorescent cell junction kit function in in vivo and in vitro cell tracing?
April 21, 2026
Clicks:67
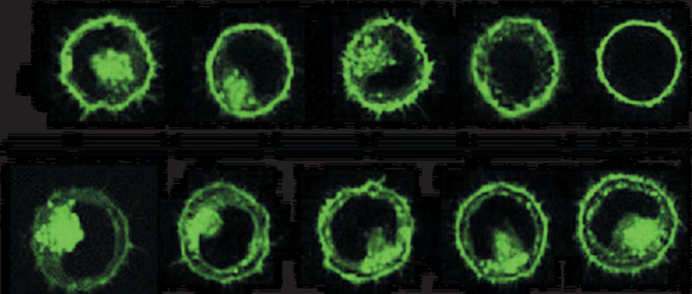
PKH67 Cell Membrane Labeling Effect
What is a Fluorescent Cell Linker Kit? —— Technical Principle and ComponentsA fluorescent cell linker kit is a cell membrane labeling system based on lipophilic fluorescent probes. Its core components usually include:
- Fluorescent Dyes: Fluorescent molecules with long aliphatic carbon chains (e.g., PKH26, PKH67), structurally possessing patented membrane labeling properties
- Diluent C: A specially designed water-soluble isotonic solution free of detergents, organic solvents, physiological salts, and buffers, used to maintain cell viability and maximize dye solubility and labeling efficiency
The working principle of this type of kit relies on the long aliphatic tails on dye molecules that can stably insert into the lipid regions of the cell membrane, forming non-covalent but stable associations with the cell membrane. The fluorescence intensity of labeled cells is typically 100-1000 times higher than background autofluorescence, with uniform fluorescence distribution facilitating subsequent detection.
What are the Spectral Differences Between PKH26 and PKH67? —— Select Dyes Based on Experimental Duration
Based on fluorescence spectra and in vivo stability, the two main dyes are suitable for different research needs:
PKH26 (Orange-Red Fluorescence):
- Spectral Properties: Maximum excitation wavelength 551 nm, maximum emission wavelength 567 nm, located in the yellow-orange spectral range
- Filter Compatibility: Compatible with rhodamine or PE detection systems; can also be excited with standard fluorescein excitation filters (but fluorescence intensity may be reduced)
- In Vivo Half-Life: Exceeds 100 days, highly suitable for long-term in vivo cell tracing, tumor growth monitoring, and long-term survival analysis after stem cell transplantation
- Applicable Scenarios: Cell fate tracking requiring weeks to months, such as tumor metastasis research and stem cell homing analysis
PKH67 (Green Fluorescence):
- Spectral Properties: Maximum excitation wavelength 490 nm, maximum emission wavelength 502 nm, exhibiting bright green fluorescence
- Filter Compatibility: Fully compatible with standard fluorescein filters, suitable for combined use with cell viability probes such as propidium iodide (PI) or 7-AAD, or multicolor combinations with phycoerythrin (PE), red fluorescent protein (RFP), etc.
- In Vivo Half-Life: 10-12 days, suitable for short-to-medium term in vivo tracing studies
- Applicable Scenarios: Short-term cytotoxicity assays, phagocytosis detection, cell-cell interactions, antigen-specific precursor frequency analysis
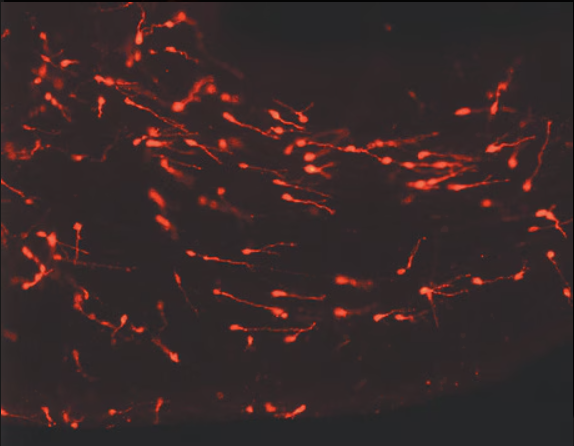 PKH26 Labeled Cell Micrograph
How Do They Achieve Cell Membrane Labeling? —— Molecular Mechanism Analysis
Successful labeling with fluorescent cell linker dyes depends on the following molecular properties:
Membrane Insertion Mechanism:
The long aliphatic carbon tails carried by dye molecules can stably insert into the lipid bilayer of the cell membrane and anchor in the membrane structure without affecting membrane integrity. This insertion is physical and does not involve chemical reactions, thus not significantly altering cell surface antigen epitopes.
Fluorescence Stability:
Fluorescence after labeling is pH-independent within the physiological pH range, and the fluorescence intensity per cell is generally unaffected by dye localization. As cells divide, the dye is evenly distributed to daughter cells, resulting in a halving of fluorescence intensity, which is the fundamental principle of cell proliferation detection.
Signal Persistence:
Compared to cytoplasmic dyes (e.g., CFSE), membrane-labeling dyes typically have longer in vivo half-lives because membrane lipid turnover is slower and dyes are less likely to be excreted by cells.
What Experimental Scenarios Require Such Reagents?
The applications of fluorescent cell linker kits cover multiple research fields:
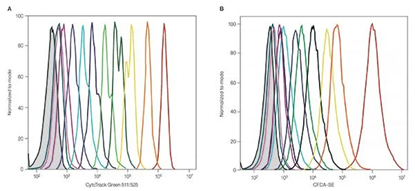
Analyze cell division generations and calculate precursor frequencies by detecting the decrease in fluorescence intensity (halved with each division) via flow cytometry. Suitable for studies on lymphocyte activation, hematopoietic stem cell proliferation, etc.
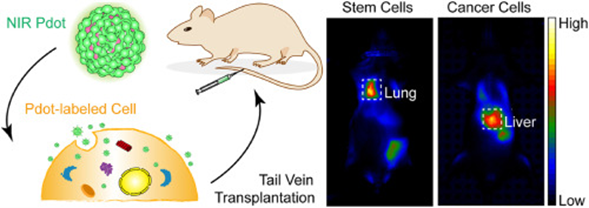
Inject labeled cells intravenously into recipient animals, and track cell migration and distribution in lymph nodes, spleen, tumor tissues, or inflammatory sites via fluorescence imaging or flow cytometry. The long half-life of PKH26 is particularly suitable for such long-term tracing.
Label target cells, co-culture with effector cells (e.g., NK cells, CTL), and assess cell killing activity by detecting loss of target cell fluorescence signal or incorporation of PI/7-AAD.
Analyze phagocytosis efficiency via fluorescence co-localization by labeling phagocytes or target particles.
Observe cell-cell contact, fusion, or membrane exchange events by labeling different cell populations with distinct colors.
Monitor the migration trajectories and distribution patterns of lymphocytes, dendritic cells, or tumor cells in vivo.
What Are the Key Steps in the Standard Staining Protocol?
Taking routine cell membrane labeling as an example, the standard operating procedure is as follows:
- 1 Cell Preparation
Prepare a single-cell suspension and wash with serum-free medium or buffer to remove serum proteins (serum proteins and lipids bind dyes and reduce effective concentration). Suspend cells are processed directly; adherent cells need to be digested into single-cell suspensions. - 2 Prepare 2× Cell Suspension
Resuspend the cell pellet with Diluent C to prepare a 2× final concentration cell suspension (typically 2×10⁷ cells/mL), mix gently by pipetting to ensure complete dispersion, avoid vortexing. - 3 Prepare 2× Dye Working Solution
Immediately dilute the dye stock solution (usually ethanol solution) with Diluent C to prepare a 4 μM 2× working solution. Note: Dye working solution must be prepared fresh and cannot be stored in Diluent C for long periods. - 4 Rapid Mixing and Incubation
Quickly mix equal volumes of 2× cell suspension and 2× dye working solution (final concentrations: 1×10⁷ cells/mL and 2 μM dye), mix immediately by pipetting. Incubate at room temperature (20-25°C) for 1-5 minutes, mixing gently periodically. Staining occurs very rapidly; longer incubation provides no additional benefit. - 5 Terminate the Reaction
Add an equal volume of serum, albumin solution (1% BSA), or complete medium to terminate the staining reaction, incubate for 1 minute to bind excess probes. Serum proteins prevent further labeling of cells by binding free dye. - 6 Washing and Resuspension
Centrifuge cells at 400×g for 10 minutes, gently aspirate the supernatant (take care not to disturb the cell pellet). Resuspend cells in 10 mL complete medium, transfer to a new centrifuge tube and wash again (at least 2 times) to ensure complete removal of unbound dye. Finally, resuspend to the desired concentration with appropriate medium for subsequent experiments or injection.
How to Ensure Staining Efficiency and Cell Viability?
- Dye Concentration Optimization: Labeling intensity is a function of both dye concentration and cell concentration. The recommended starting concentration is 2 μM, but optimization is required based on cell type and experimental purpose. Over-labeling causes loss of cell membrane integrity and reduced cell recovery.
- Avoid Over-Incubation: Control staining time within 1-5 minutes; prolonged incubation may reduce cell viability.
- Strict Serum-Free Operation: Cells must be thoroughly washed with serum-free medium before staining; lipids and proteins in serum competitively bind dyes.
- Rapid Mixing Is Critical: Staining occurs almost instantaneously after mixing dye and cells; rapid and uniform cell dispersion is essential for bright, consistent, and reproducible labeling results. Avoid "pipetting up and down" or vortexing, which damage cells.
- No Long-Term Storage in Diluent C: Diluent C contains no physiological salts or buffers; long-term cell storage in it leads to reduced viability. Transfer to complete medium immediately after staining.
- Protect from Light: Fluorescent dyes are prone to quenching; light protection is required during operation and storage.
- Control Setup: Unstained controls (mock-stained control) must be included to determine background fluorescence levels, and Diluent C-only controls to assess the effect of the diluent itself on cells.
Conclusion
Fluorescent cell linker kits provide a stable and long-lasting cell labeling solution for cell biology research through a unique membrane lipid insertion mechanism. The long half-life of PKH26 makes it the first choice for long-term in vivo tracing, while the green fluorescence of PKH67 is suitable for multicolor combinations with various other fluorescent probes. Mastering the technical points of "rapid mixing, brief incubation, protein termination, and thorough washing", and selecting the appropriate dye based on experimental duration (short-term vs. long-term) and spectral compatibility (single staining vs. multicolor), are the keys to successful cell tracing experiments. Whether for in vitro proliferation analysis, cytotoxicity detection, or in vivo cell migration tracking, these kits provide researchers with reliable "cell identity tags".
Recommended Absin Fluorescent Cell Linker Kits:
Contact Absin
Absin provides antibodies, proteins, ELISA kits, cell culture, detection kits, and other research reagents. If you have any product needs, please contact us.
| Absin Bioscience Inc. worldwide@absin.cn |
 Follow us on Facebook: Absin Bio Follow us on Facebook: Absin Bio |