- Cart 0
- English
Western Blot (WB) Protocol: A Comprehensive Experimental Guide
March 12, 2026
Clicks:313
*This protocol is applicable to cell/tissue samples as a general-purpose protocol; please refer to other resources for optimization with special samples
Introduction
Western Blot (protein immunoblotting, abbreviated as WB) is a core technology in the fields of molecular biology and biochemistry, and serves as the gold standard for protein analysis. It combines the protein separation capability of SDS-polyacrylamide gel electrophoresis with the specificity of immunodetection, enabling qualitative and semi-quantitative expression analysis of specific target proteins in complex samples. It is widely applied in basic research, clinical diagnostics, and biotechnology development.

Core Principle
Proteins are denatured by SDS and imparted with uniform negative charges, then separated by molecular weight via SDS-PAGE; subsequently transferred to nitrocellulose or PVDF membranes through electrophoretic transfer. Target-specific primary antibodies bind to the proteins, followed by enzyme/fluorophore-conjugated secondary antibodies for signal visualization. Finally, protein expression and molecular weight are analyzed through the presence, position, and intensity of bands.
Experimental Procedure
Step 1: Sample Preparation
Extract proteins from cells/tissues and prepare lysates. Keep samples and buffers on ice throughout the procedure to prevent protein degradation.
Cell Culture Lysate Preparation Protocol
1. Prepare lysis buffer according to the manual. Supplement with protease inhibitors if not included; add phosphatase inhibitors for phosphorylated protein detection;2. Collect cells
3. Adherent cells: When cell density reaches 80-90%, proteins can be extracted. Discard supernatant, wash with ice-cold PBS 2-3 times, add lysis buffer (150-250 μL per well of 6-well plate), scrape cells with cell scraper, pipette to mix, collect into EP tubes, lyse on ice for 5 min (sonication-assisted lysis optional), centrifuge at 10,000-14,000 rpm for 3-5 min, collect supernatant for use.
4. Suspension cells: Generally extract when density reaches 8-1.5 × 10⁶ cells/mL (confirmed by cell counting), centrifuge at 100-500 g at 4°C for 5 min, wash with PBS 2-3 times, resuspend in ice-cold lysis buffer (1 mL lysis buffer per 1×10⁷ cells), lyse on ice for 5 min (sonication-assisted lysis optional), centrifuge at 10,000-14,000 rpm for 3-5 min, collect supernatant for use.
5. Determine protein concentration by BCA assay. Based on BCA results, normalize sample protein concentrations using lysis buffer containing protease inhibitors.
6. Add loading buffer (with reducing agent) and dilute to total protein concentration of 1-3 μg/μL;
7. Aliquot and store at -80°C for future use.
Tissue Lysate Preparation Protocol
1. Mince tissue into fine fragments.
2. Thaw RIPA lysis buffer completely and mix well. Take appropriate amount of lysis buffer, add PMSF (MW: 174.19 g/mol) within minutes before use to a final concentration of 1 mM.
3. Add lysis buffer at a ratio of 150-250 μL per 20 mg tissue.
4. Homogenize with a tissue homogenizer, after complete lysis, centrifuge at 10,000-14,000 g for 3-5 min, collect supernatant for subsequent experiments.
5. Subsequent protein quantification, dilution, and storage steps are the same as for cell samples.
【Note】: A small translucent gelatinous mass often appears in RIPA lysates, which is normal. This gelatinous mass contains genomic DNA complexes. For detection of proteins not tightly bound to genomic DNA, supernatant can be directly collected by centrifugation for subsequent experiments; for detection of proteins tightly bound to genomic DNA, sonication can be used to disperse these gelatinous masses, followed by centrifugation to collect supernatant. For common transcription factors such as NF-κB and p53, sonication is usually not required.
Step 2: Loading and Electrophoresis
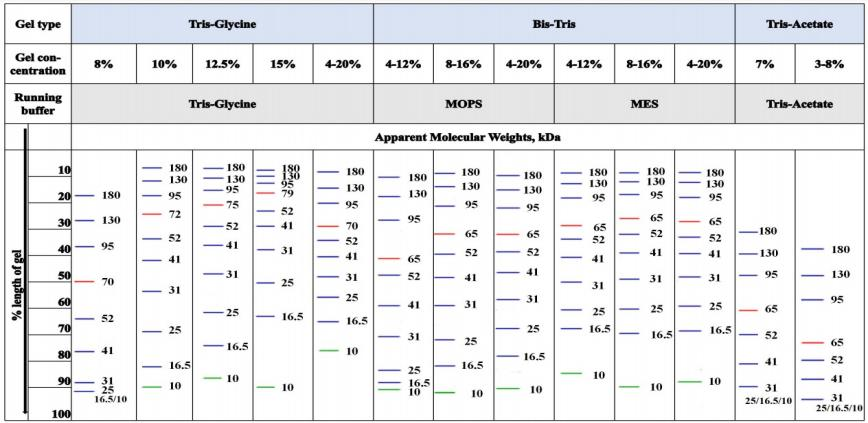
Select gel and buffer system based on target protein molecular weight, separate proteins by SDS-PAGE.Gel / Buffer System Selection
|
Protein Molecular Weight (kDa) |
Gel Percentage (%) |
|
12-45 |
15 |
|
15-60 |
12 |
|
20-80 |
10 |
|
30-120 |
8 |
|
60-200 |
6 |
Operating Procedures
1. Heat protein samples in a metal bath at 95°C for 5 min, cool to room temperature after heating, briefly centrifuge to collect proteins at the bottom of the tube.2. Install gel into electrophoresis apparatus, properly place precast gel, prepare running buffer according to manual, add buffer to submerge gel, check for leakage, slowly remove comb.
【Note】: Some precast gels require removing the bottom gel strip; when removing the comb, avoid bending the gel strips
3. Use pipette to load marker and samples into wells. Recommended loading: 20-50 μg for cell samples, 50-100 μg for tissue samples, 10-500 ng for purified protein (avoid overloading, do not touch well bottom with pipette tip to prevent band distortion);
4. Connect electrodes, optimize voltage/time based on target protein size (larger proteins require higher voltage and longer time). Generally run at constant 150V for 30-50 min, stop when bromophenol blue reaches the bottom.
Step 3: Transfer
Transfer proteins from gel to membrane, supporting semi-dry transfer and wet transfer. Core requirement: gel close to negative electrode, membrane close to positive electrode.
Transfer Membrane Selection
Two types of transfer membranes are available: PVDF and NC. PVDF requires methanol activation; NC does not. For proteins <20 kDa, select 0.2 μm pore size; for >20 kDa, select 0.45 μm.
|
Parameter |
NC Membrane |
PVDF Membrane |
|
Sensitivity |
High |
High |
|
Background |
Low |
May exhibit fluorescent background relative to NC |
|
Protein Binding Capacity |
Relatively weak 80-110 μg/cm² |
6-fold stronger than NC |
|
Physical Properties |
Dry NC membrane is brittle |
High mechanical strength |
|
Procedure |
Equilibrate in buffer, no methanol activation required |
Activate with methanol beforehand |
|
Detection Method |
ECL detection |
Compatible with ECL detection and Coomassie blue staining |
|
Application Range |
> 20 kDa, 0.45 μm < 20 kDa, 0.2 μm |
|
1. While waiting for electrophoresis, prepare transfer buffer and membrane. Dilute 10× transfer buffer with methanol and water at a ratio of 1:2:7.
【Note】: Add in the order of water-transfer buffer-methanol; avoid direct contact between methanol and water to prevent excessive heat generation;
3. When assembling the sandwich, note that protein migration is from negative to positive electrode. Place the negative electrode plate (usually black) at the bottom, then sequentially add sponge, filter paper, and gel. Cut membrane to gel size beforehand and mark appropriately.
4. PVDF membrane requires activation before use, soak in methanol for 30-60 seconds (NC membrane does not require activation).
5. Cover the activated membrane onto the gel (note some membranes have distinct sides), handle membrane by edges with forceps to minimize contact, use roller to remove bubbles. After confirming no bubbles between gel and membrane, sequentially add filter paper and sponge, clamp securely, sandwich assembly complete, load into transfer cassette.
6. For wet transfer, add transfer buffer and place transfer cassette in ice bath; wet transfer is most reliable, semi-dry transfer saves time (semi-dry does not require additional transfer buffer, generally no ice bath needed). Ensure correct polarity connection, black is negative.
7. General conditions: constant voltage 70/100V, constant current 200-250 mA, 1 min per 1 kDa, applicable to most protein molecular weights (refer to manual for current-time correspondence).
【Note】: Verify transfer efficiency by prestained marker and Ponceau S staining; fluorescent detection methods should avoid Ponceau S staining (prone to high background fluorescence).
Step 4: Blocking and Antibody Incubation
Block non-specific binding sites on membrane, bind target protein through primary/secondary antibody specificity.
General Required Materials
Core Blocking Buffer Selection
- BSA: Single component, phosphate-free/biotin-free, clean background. Suitable for phosphorylated proteins, biotin-streptavidin systems, AP detection, quantitative WB. No absolute contraindications (some antibodies may show slightly higher background).
- Skim Milk: Extremely low cost, strong blocking capability, easy preparation. Suitable for routine total proteins, high-abundance targets, HRP detection (non-biotin). Not suitable for phosphorylated/glycoproteins, biotin systems, AP secondary antibodies.
- Commercial Blocking Buffer: Convenient to use, standardized, batch-to-batch stability, contains antibody stabilizers, generally high compatibility.
Blocking
1. After transfer, move membrane into a flat dish or other suitable container (membrane washing optional).2. Based on membrane size, add appropriate volume of Western Blot Rapid Blocking Buffer to completely submerge membrane. For 5×8 cm membrane, recommended volume is 5-10 mL.
3. Place on horizontal shaker, incubate with agitation at room temperature for 10 min.
4. Remove blocked membrane, rinse with wash buffer (TBST/PBST) 2-3 times, ready for subsequent antibody incubation.
Antibody Incubation Procedure (Primary + Secondary)
5. Dilute primary antibody according to manufacturer's recommendation and incubate with membrane, overnight at 4°C or 1 h at room temperature, wash with TBST 3 times ×5 min;6. Dilute secondary antibody according to manufacturer's recommendation, cover membrane and incubate with gentle agitation at room temperature for 1 hour;
7. Wash membrane again with TBST 3 times, 5 min each.
Step 5: Signal Detection
Select fluorescent detection or chemiluminescence based on experiment. Chemiluminescence supports CCD imaging (recommended) and X-ray film imaging (when CCD unavailable).
(Using X-ray film as example)
1. Based on membrane size, mix 0.5 mL Solution A and 0.5 mL Solution B per 10 cm² membrane to prepare chemiluminescence working solution.
2. Remove membrane with flat forceps, gently touch lower edge to absorbent paper to remove excess liquid. Place membrane protein-side up on clean plastic wrap (some commercial plastic wraps may quench fluorescence; select high-quality wrap). Transfer chemiluminescence working solution to membrane with pipette to cover evenly, incubate at room temperature for 2 min.
3. Hold membrane with flat forceps, gently touch lower edge to absorbent paper to remove excess liquid. Place membrane protein-side up, wrap in clean plastic wrap. Gently remove bubbles, fix in X-ray film cassette.
4. In darkroom, place X-ray film on wrapped membrane, close cassette, expose for 30 sec to 1 min. Develop and fix immediately; adjust exposure time for subsequent films based on exposure intensity.
Contact Absin
Absin provides antibodies, proteins, ELISA kits, cell culture, detection kits, and other research reagents. If you have any product needs, please contact us.
| Absin Bioscience Inc. worldwide@absin.cn |
 Follow us on Facebook: Absin Bio Follow us on Facebook: Absin Bio |